")
Innholdsfortegnelse:
- Trinn 1: DELER NØDVENDIG:
- Trinn 2: SOLDING
- Trinn 3: Bor et lite hull
- Trinn 4: Forbered holderen for godteri
- Trinn 5: FESTE TIL MOTOR
- Trinn 6: Etterbehandling for dispenserhuset
- Trinn 7: MOTORDRIVER
- Trinn 8: ARDUINO
- Trinn 9: Last opp koden
- Trinn 10: Koble til Bluetooth -modulen
- Trinn 11: HANDLINGSTID
- Forfatter John Day day@howwhatproduce.com.
- Public 2024-01-30 11:25.
- Sist endret 2025-01-23 15:02.

I denne instruksjonsfilen viser jeg hvordan du bygger en automat med en Arduino.
KOMMENTER DET DU TROR OM DENNE INSTRUKTIVELSE, SÅ AT JEG KAN FORBEDRE I MINE VIDERE INSTRUKTABLER
ta en titt på videoopplæringen for en bedre forståelse av hele opplæringen.
Trinn 1: DELER NØDVENDIG:


☻ Hoppetråder
☻KORTBOKS (foretrekker liten eske som vist)
☻ARDUINO UNO
☻LAPTOP ELLER PC (FOR OPPLADING AV KODE TIL ARDUINO)
☻ STRØMFORSYNING (JEG BRUKTE EN MAKTBANK FOR Å SPARE BATTERIER)
☻1 x girmotor
Driver motor driver
Trinn 2: SOLDING


lodd to ledninger til motoren
Trinn 3: Bor et lite hull


bruk loddejernet for enkelt å lage et hull som vist
Trinn 4: Forbered holderen for godteri

gjør avstand mellom to pappstykker som er lik størrelsen på godteriet … slik at bare ett godteri får plass i det
Trinn 5: FESTE TIL MOTOR


lim lokket og holderen (som ser ut som et gir) på motoren som vist
Trinn 6: Etterbehandling for dispenserhuset


lim et ekstra stykke papp
lag et lite vindu (godteri kommer ut herfra)
legg til en støtte (slik at den ikke faller av)
Trinn 7: MOTORDRIVER


koble motoren til motorføreren
koble også til strømkabelen til motorføreren
Trinn 8: ARDUINO


koble motordriveren til arduinoen
bruk pinne 8, 9 som vist
Trinn 9: Last opp koden

åpne lenken for å laste ned koden og laste den opp til Arduino:
www.youtube.com/redirect?q=https%3A%2F%2Fdrive.google.com%2Fopen%3Fid%3D1-g-a0i3RtAavBa2RwDP8RFfRWasLYXuz&redir_token=6UA4fR1_cq2RqgiXVnwkv1_0dPl8MTUxNDQ0MzE3OUAxNTE0MzU2Nzc5&v=kPk100UpKiI&event=video_description
Trinn 10: Koble til Bluetooth -modulen


Konfigurasjon av Hc-05 Bluetooth-modul
* Rx-Tx
*Tx- Rx
*Vcc-5v
*Gnd-Gnd
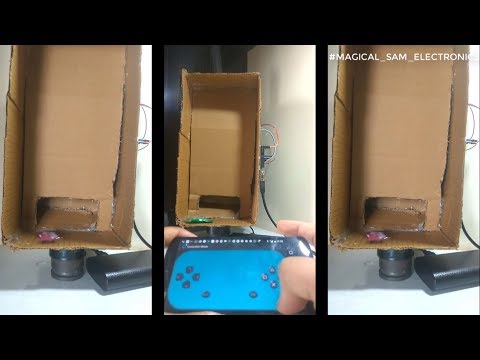
Trinn 11: HANDLINGSTID


legg til et lite papirrør (for å stable godteriene over hverandre) og det er klart til bruk.